That Freekick Challenge Free Kick Setup Guide
Target first, then route — fair tests with wall, keeper, and INSIDE FOOT CURLED.
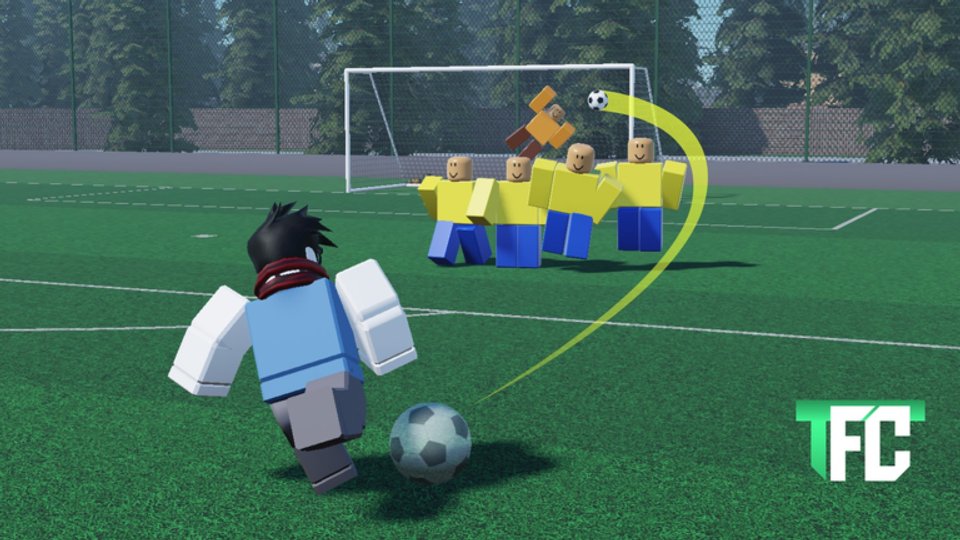
A good free kick in That Freekick Challenge starts before you touch the power meter. Setup is the craft of choosing a reachable target, drawing a yellow trajectory that clears the wall, setting approach angle and power percentage, and locking INSIDE FOOT CURLED so every practice kick teaches the same lesson. This guide shows how to build that layout, run a fair test, and carry the same habits into challenge 1v1.
Read Controls if you still need the key map. Use How to Score for the finishing recipe and Beat the Wall when defenders keep blocking. New players should also finish Getting Started and claim Codes before buying cards.
Setup elements that matter
| Element | Decision it helps you make |
|---|---|
| Ball position | Where the shot begins and how wide the wall lane is |
| Defensive wall | Whether a direct lane is blocked and how much lift or bend you need |
| Goalkeeper | Which post pocket is open after the ball clears defenders |
| Yellow trajectory | Whether the planned path clears obstacles and approaches the frame |
| Angle readout | How far you moved from the last attempt |
| Power percentage | Which charge band you will compare next kick |
| Shot label | Confirm INSIDE FOOT CURLED for learning bends |
Treat the sandbox as a laboratory. Props, barrels, or cones may appear in creative layouts, but scoring still comes down to clearing humans and finding the net. Check live game rules for any special object scoring; do not invent house rules from screenshots alone.
Target first, then route
Never start by maxing Power. Decide where you want the ball to finish — just inside the far post is the classic learner target — then reverse-engineer the route from ball to goal.
- Spot the open post relative to the keeper.
- Trace a path that goes over or around the wall, not through it.
- Nudge A / D for approach angle and Q / E for curl until the yellow line matches that path.
- Raise or lower with W / S until the preview clears defender height.
- Only then choose a power percentage, usually 60–65% for consistency.
This order keeps every dial purposeful. Angle exists to open a lane. Curl exists to return the ball inside the frame. Height exists to beat the wall. Power exists to arrive before the keeper — not to replace the other three.
Fair test protocol
A fair test means you change one variable while everything else stays frozen.
- Place wall, goalkeeper, and ball. Do not move them for the next three kicks.
- Press R between attempts if you need to restore the ball without rebuilding props.
- Set INSIDE FOOT CURLED with Left Ctrl.
- Take kick one as a baseline at 60–65% power.
- On a miss, change only height, only curl, only angle, or only power.
- Write down (or remember) the angle number and power percent that finally cleared the wall and threatened the net.
If the ball misses the goal entirely, pull the target back toward the frame before adding more Curve or Power. Ambitious far-post dreams fail when the line never enters the rectangle.
Wall and keeper as separate problems
Solve the wall before you obsess over the keeper. A shot that kisses the first defender never tests your finishing. Raise trajectory or widen the bend until clearances are routine, then adjust the final target to the open post. Beat the Wall walks through collision fixes in detail.
Once clearances stick, watch keeper shading. Central keepers invite post pockets. Near-post keepers invite far-post curls. Your setup should make that read obvious from the camera angle — use C / V so you are not guessing.
Stats and perks inside a setup
Your card’s Accuracy, Precision, Power, and Curve change how forgiving the same layout feels. Do not dump every point into Power; a high-Power card still needs Accuracy and Curve to hold an inside-foot route. Compare cards on Players after redeeming Coins from Codes.
Perks slot into the same philosophy:
- Zone makes a middling card feel complete for one shot by lifting all four attributes.
- Rocket rewards a setup that already clears the wall by adding launch speed.
Rankings and situational notes live on the Tier List. Perks amplify a correct route; they do not invent one.
Challenge 1v1 translation
You may not place custom walls in every duel, but the mental setup remains identical: pick target, confirm shot type, visualize clear-then-bend, charge mid power, release. Practice that script in the sandbox with a fixed layout until it is boring. Boring means reliable — exactly what you want under challenge pressure.
If a patch changes free-kick feel, re-run the fair test protocol and check Updates. Re-lock your default angle and power numbers before you queue again.
Sibling guides
- Getting Started — first-hour checklist and stat balance.
- Controls — keys for charge, curl, height, and reset.
- How to Score — curling finish recipe at 60–65% power.
- Beat the Wall — dedicated clearance troubleshooting.
Also use Scripts only with caution, and the Wiki hub for overview links. Build the setup on purpose, test it fairly, and your free kicks in That Freekick Challenge stop feeling random.
Frequently Asked Questions
Quick answers to the most common questions.
What should I set before charging power?
Pick a target inside the goal, confirm INSIDE FOOT CURLED, shape the yellow trajectory to clear the wall, then set angle and a mid-power band around 60–65%.
What is a fair free-kick test?
Keep wall, goalkeeper, and ball position fixed for several kicks while changing only one setting at a time so each miss has a clear lesson.
Why does the shot label matter?
Learners should stay on INSIDE FOOT CURLED so Q/E bends behave predictably while you practice clearing the wall and finding the far post.
Should I move the wall every kick while learning?
No. Freeze the layout until you can clear it consistently. Constantly moving props hides whether your route or your power caused the miss.
How do Zone and Rocket fit into setup practice?
Use them after the route works. Zone boosts all four stats for the shot; Rocket adds speed. Neither replaces a yellow line that still hits the wall.
Where do I learn the keys for angle and height?
Open the Controls guide: A/D adjust approach angle, W/S change trajectory height, and R resets the ball for repeatable tests.